How to Properly Acclimate Tissue Culture Plants


Introduction
Acclimatization or hardening is one of the crucial stages of plant tissue culture at which plants are gradually adapted to the outside environment. During the process, the plantlets obtained after the multiplication and rooting stage are transferred to a semi-controlled environment, which is generally a greenhouse. This prepares them to survive in a more variable external or natural environment with uncontrolled air, temperature, light, and the huge presence of pathogens and pests.
Shoots and cultured plants are cultivated in conditions with minimal physiological stress, thanks to the provision of a carbon source (usually sucrose or another sugar), lessening the reliance on photosynthesis. The aseptic in vitro environment reduces the risk of pathogenic organisms, resulting in plants that are not well-suited for survival in greenhouse and field conditions.
Successful acclimatization techniques focus on adapting the plants to lower relative humidity, increased light levels, autotrophic growth, and the non-sterile conditions typical of greenhouses and fields.
This article walks you through the steps of properly acclimating your plants after they are ready and provides a list of items you may need in the process.

Steps For Proper Plant Tissue Culture Acclimatization
The acclimatization of plants is one of the crucial steps of tissue culture that’s required to be carefully performed.
The stage is further divided into four sub-steps as given below:
Step One: Thoroughly Clean Your Plantlets
Wash your hands and wear gloves to take out the plantlets from the tissue culture environment. Place the culture vessels/jar on a sterilized or clean surface and remove plantlets from their respective culture vessels (or jars) with a gentle hand.
Wash roots thoroughly to remove any residue of sucrose or gel media from the roots as it can serve as a medium for the growth of potential disease-causing organisms.
At this stage you will want to remove any yellow or brown leaves using your tweezers, castroviejo scissors, or carefully using your hands to remove these causing the most minimal damage to the good plant material.
Some prefer to immerse plantlets in a fungicide solution, made of Physan 20 or Captan (take the amount as suggested by the product manufacturer, which is usually just a few drops per gallon) and distilled water, for about 5 to 10 minutes. This is followed by rinsing the chemical off from plants by letting the plants sit for another 10 minutes in just distilled water. The process helps in preventing any fungal infection in plants during their acclimatization process.
Step Two: Transferring Plants To A Sterile Medium
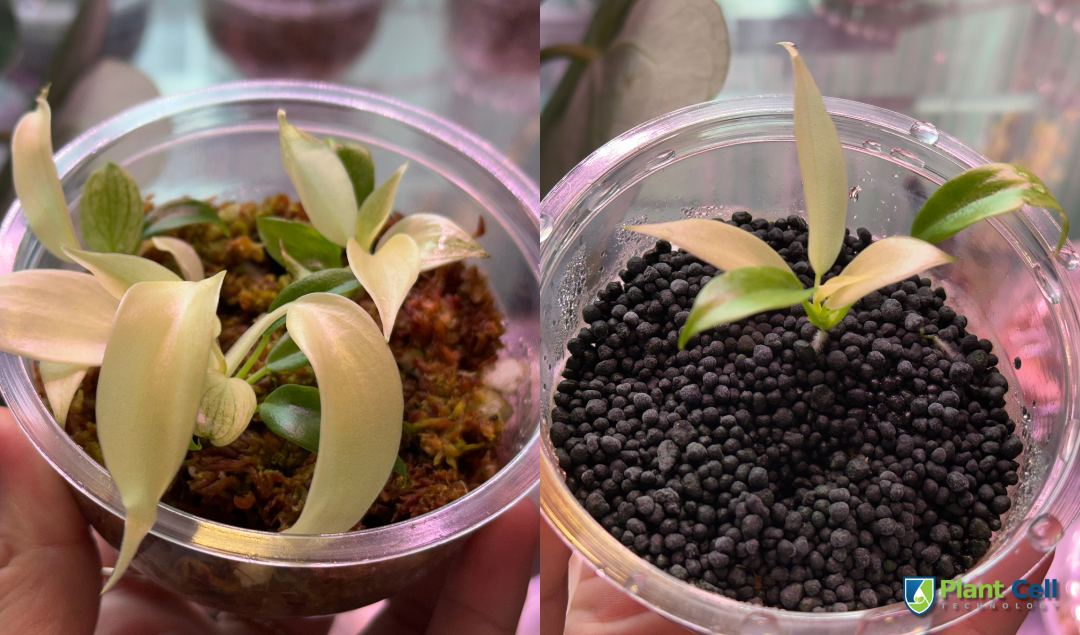
Now you have your plant, but you can not directly transfer it to soil media. Some mediums frequently used for the acclimatization of plants are sphagnum moss, vermiculite, perlite, fluval stratum, peat, or a mix of some of them. The mediums that have worked the best for us are a mixture of sphagnum moss and perlite, sphagnum moss alone, or fluval stratum. However, it is good to note that these should be picked not only based on your own expertise, but what may work best with the plants you are working with (similar to what you would do when moving regular plant cuttings propagation from water to a medium).
For instance, the reason why the mixes mentioned above have worked great for our team so far, is because we work with a lot of aroids and these seem to work great. If working with carnivorous plants, sphagnum moss alone has seemed to work great as well, so pick your mediums wisely.

Pro tip: if this is the first time you are acclimating a specific plant genus and you have multiple plantlets of the same plant, this may be a great time to experiment and plant one in each of your preferred mediums to see which one performs best.
Francisco, our lab director and master class instructor, for instance, prefers not to root the plantlets in-vitro and tends to choose fluval stratum to acclimate the plants as it has shown to be a great medium to quickly root the plants outside of tissue culture. (Did you watch our social media short video on how easy it is to acclimate plants out of the BioCoupler™?, Click here to watch that quick video).
However, if your plant already has a strong root system, you may be better off going for a more cost effective medium like sphagnum moss, or a mix of sphagnum moss and perlite.
Now you have your medium in a small pot, so make a small hole in it using your finger, place the plant roots in the middle of this hole and gently cover them with the sterile mixture. Ensure that shoots are not covered and present above ground.
As you know in vitro plants lack several crucial tissues required for their survival in natural environments, thus exposing them directly to even a greenhouse environment can kill you plants. You need to create a mini greenhouse by placing your plants in a transparent plastic dome, big enough to incorporate your plants in a bot without any leaves touching the walls of the box or dome-shaped container.
The container helps maintain a high level of humidity and trap moisture for tissue culture plants. The transparency of the container allows the light to reach plants without damaging them due to overheat.
At this point in your tissue culture acclimation process, the container does not need to have any orifice, in fact, it should be in a completely enclosed environment, like these shown below. Your plant has been used to 100% humidity in its tissue culture container up to now and you want to change the medium but not its environment just yet.
The first 2 to even 4 weeks, or after your plant has grown at least a couple new leaves and some new roots in this new environment, then you want to start acclimating it to its environment around it.

One method to use is to open the lid of the tissue culture container for about a minute per day and slowly start increasing the time that you keep the lid open until the new leaf growth seems to be more hardened. Alternatively, you can make holes in the container for ventilation. You will need to gradually lower the humidity as your plant starts settling into the new environment.

Pro tip: if you have a greenhouse environment, this would be the more suitable place to start the process of acclimation before a dryer climate.
Step Three: Creating a Suitable Physical Environment
Your plants are out of the tissue culture environment. But, it doesn’t mean that you need to suddenly attack them with fluctuating physical conditions. You need to gradually adapt them to the greenhouse conditions or your environment.
For example, at the beginning, keep the plants in shady areas or under low-intensity grow light and there should be 80%-90% humidity in the plant’s chamber. The intensity can be increased and the humidity can be reduced gradually over a few weeks. Further, you need to ensure that the temperature is set around 22-25 degrees Celsius or 68-77 degrees Fahrenheit.
Pro tip: if you have a colder environment, consider placing your cultures on a seedling heat mat, however, if using a heat mat, ensure they are not in a high-intensity light environment, because heat from the top and the bottom can be very damaging for tissue culture plantets.

Do not overwater plants as it can lead to root rotting and eventually death of plants. Thus, keep the media moist for which you can use a mist spray. After a few weeks of acclimatization, a light fan breeze helps strengthen plants’ stems.
Step Four: Transferring Plants To Bigger Pots And Continued Care
Once your plants have become acclimated after 4-8 weeks, transfer them to a larger pot. At this stage, you can move them to a pot containing regular soil, or you may choose to move to another semi-hydroponic medium, or even keep it in the same medium but move to a bigger container nonetheless. Monitor them regularly for any signs of stress, such as discoloration or wilting.

Rooted cuttings that haven't undergone proper hardening often exhibit stress indicators such as wilting, necrosis at the leaf margins and tips, and the complete demise of leaves or entire plants.
Materials You May Need For Acclimatization of Plants
At Plant Cell Technology we are committed to making your tissue culture easier and better. Thus, I have listed here some items that you might need for the best acclimatization of your plants:
- Round Snap-Lock Containers
- Sterile Petri Dish Packs
- Hydrofarm Physan PSPTA20 Algaecide, Fungicide, Bactericide, Virucide
- xGarden 8 Quarts Horticultural Grade Premium Perlite - Coarse and Chunky
- SuperMoss (22325) Orchid Sphagnum Moss Dried
- Fluval 12694 Plant and Shrimp Stratum
- Soltech Solutions Grove™ LED Grow Light
- Surgical Grade Blades
- Castroviejo Scissors 5.5
- 99% Isopropyl Alcohol

Want To Learn How To Best Acclimate Your Tissue Culture Plants?
We’re offering tissue culturists, growers, and plant enthusiasts a comprehensive tissue culture master class that gives them proper training to start into tissue culture right away.
Here are the benefits that you will enjoy after taking this class:
- Understanding all the terminology and learning the basics of tissue culture.
- Introduction to all equipment used in tissue culture, how they work, and how you can use them.
- Learning about building a home-based or commercial-scale tissue culture lab on a low to high budget.
- Creating a protocol or resources to search for them.
- Media preparation includes the order of adding individual components, adjusting pH, and autoclaving.
- Learning about the technique of obtaining explants from the mother source and surface sterilizing of explants.
- General practices to follow to provide complete aseptic conditions for protecting your plants against all kinds of contamination.
- Get a working protocol for the plant you attend the master class.
- Get all your tissue culture questions from an expert.
- How to regenerate healthy shoots and roots of your plants.
- Tips and process of best acclimating a plant.
- Network with like-minded tissue culturists.
And, there’s much more!!

Our master classes are basically a package to prepare and train you to instantly get started in the process by delivering you exactly what you need.
So, level up your tissue culture game by signing up for the masterclass TODAY!
P.S. You can also find details about our upcoming master classes using the same link.
Blog Categories
View by Level
Popular Blogs

Understanding Plant Tissue Culture and Organ Culture from the Inside Out
Summary: Plant tissue and organ culture (PTOC) is a sterile laboratory technique used to grow plant cells, tissues, or organs...
Read More
Preparing Murashige & Skoog (MS) Media: Step by Step Procedure
You must know, of all the media, the Murashige-Skoog (MS) medium is one of the most extensively used in plant...
Read MoreFollow Us On Social


Follow Us On Social
Follow Us On Social
Join the conversation
Your email address will not be published. Required fields are marked